写在前言
本文主要记录下Hexo使用butterfly主题优化的一些操作,便于后续可寻可查,首先感谢butterfly主题官方提供者
butterfly主题
hexo-theme-melody官方介绍
If you are in Mainland China, you can download in Gitee
下载安装主题 1,在你的 Hexo 根目 使用git可以直接下载
git clone -b master https://github.com/jerryc127/hexo-theme-butterfly.git themes/butterfly
或者NPM安装
npm i hexo-theme-butterfly
2,在hexo工作文件夹的根配置文件_config.yml中设置主题
# Extensions
3,执行如下命令测试看是否安装成功(需要在hexo主题根目录执行)
hexo clean
主题页面设置 标签页
前往你的 Hexo 博客的根目录
输入 hexo new page tags
你会找到source/tags/index.md这个文件
修改这个文件:
5. 添加添加 type: “tags”
---
分类页
前往你的 Hexo 博客的根目录
输入hexo new page categories
你会找到source/categories/index.md这個文件
修改这个文件:
记得添加 type: “categories”
#hexo new page categories
友情链接
前往你的 Hexo 博客的根目錄
输入 hexo new page link
你会找到source/link/index.md這個文件
修改这个文件:
記得添加 type: “link”
#hexo new page link
6,友情链接添加
在Hexo博客目录中的source/_data(如果沒有 _data 文件夾,请自行创建),创建一个文件link.yml
- class_name: 友情链接
class_name 和 class_desc 支持 html 格式,如不需要,也可以留空。
相册 图库页面是一个普通的页面挂在图片信息概念,具体构建如下所示
#hexo new page photos
子页面 子也面也是普通的也面,你只需要hexo new page xxxxx 创建你的也面就行
然后使用标签外挂 gallery,具体用法请查看对应的內容。
# 创建子页面
404页面 主題內置了一個简单的404页面,可在設置中开启
在主题_config.yml配置文件,查看404配置
# A simple 404 page
其他页面 同理,使用相同的方式创建,我这边创建有如下页面
hexo new page archives #归档
站点主题设置 语言 修改站点Hexo根目录 配置文件 _config.yml
默认是 en
网站资料 修改站点各种资料,例如标题、副标题和邮箱等个人资料,请修改博客根目录 的_config.yml
# Site
导航菜单 修改主题的配置文件位于themes/butterfly/_config.yaml
前面列 文字可自行更改,默认是英文的,用户可以根据需求修改成中文 ,示例如下
menu:
必须是 /xxx/,后面||分开,然后写图标名,如果不希望显示图标,图标名可不写。
默认子目录是展开,如果你想要隐藏,在子目录里面添加 hide 。
List||fas fa-list||hide:
副主题设置 如果没设置副标题,上面的description:签名,就是显示在主页面。而设置的话,签名自动不显示,副标题出现。
修改 主題配置文件
# the subtitle on homepage (主页subtitle)
副标题字体大小颜色 在\themes\butterfly\source\css\_layout中的head.styl:
#site-subtitle
图片设置 图片可以使用网上的图片(即使用该图片链接),也可以使用\themes\butterfly\source\img下的图片。
网站图标 # Favicon(网站图标)
个人资料头像 # Avatar (头像)
首页面图片 # The banner image of home page (首页的横幅图像)
子标签页图片 # The banner image of archive page
主页的顶部图可以在_config.yml设置index_img
``archives页的顶部图可以在_config.yml设置archive_img`
其他page页的顶部图可以在各自的md页面设置front-matter中的top_img
favicon: /img/favicon.png
文章列表图片 修改 主題配置文件 /themes/butterfly/_config.yaml
cover:
图片查看大图 修改 主題配置文件 /themes/butterfly/_config.yaml
这是两种方式,只能选择一个 或者 两个都不选
# medium-zoom
图片慢加载 1.新增hexo-lazyload-image模块
npm install hexo-lazyload-image --save
2.在主目录配置文件_config.yml增加配置
lazyload:
这个就是图片没加载出来的时候,出现一个动图转转转。
图片描述 可开启图片Figcaption描述文字显示
优先显示的 title 属性,然後是 alt 属性
修改 主题配置文件 ,默认false,这里保持默认不修改
代码框 1,代码高亮主题
Butterfly 支持6种代码高亮样式,修改主題配置文件
darker
2,代码复制
主題支持代码复制功能,修改主题配置文件
3, 代码展开和折叠
在默认情況下,代码框自动展开,可设置是否所有代码框都关闭专题,点开>可展开代码,修改 主題配置文件
true 全部代码框不展开,需点击>打开
false 代码框展开,有>点击按鈕
none 不显示>按鈕
highlight_shrink: true #代码框不展开,需点击>打开
你也可以在post/page也对应的markdown文件front-matter添加highlight_shrink来独立配置。
当主题配置文件中的 highlight_shrink 设为true时,可在front-matter添加highlight_shrink: false来单独配置文章展开代码框。
当主题配置文件中的 highlight_shrink 设为false时,可在front-matter添加highlight_shrink: true来单独配置文章收縮代码框。
4,代码换行 在默认情況下,Hexo 在编译的時候不会实现代码自动換行。如果你不希望在代码块的区域里有橫向滾动條的話,那麼你可以考慮开启這個功能。
修改 主题配置文件
code_word_wrap: true #我这边设置的是false
如果你是使用 highlight 渲染,需要找到你站点的 Hexo 配置博客根目录 文件_config.yml,將line_number改成false:
highlight:
如果你是使用 prismjs 渲染,需要找到你站点的 Hexo博客根目录 配置文件_config.yml,將line_number改成false:
prismjs:
5,代码高度设置
3.7.0 及以上支持
注意:單位是 px,直接添加數字,如 200
实际限制高度为 highlight_height_limit + 30 px 多增加 30px 限制,目的是避免代码高度只超出highlight_height_limit 一点時,出現展开按鈕,展开沒內容。
不適用于隐藏後的代码块( css 設置 display: none)
可配置代码高度限制,超出的部分会隐藏,並显示展开按鈕。
highlight_height_limit: false # unit: px
社交信息设置 Butterfly支持 font-awesome v6图标.
书写格式 图标名:url || 描述性文字(可以选择使用fa fa-xxx图标,也可以选择使用阿里iconfont图)
# social settings (社交图标设置)
主页文章节选 因为主题UI的关系,主页文章節選只支持自动節選和文章页description。
在butterfly里,有四種可供選擇
description: 只显示description
both: 優先選擇description,如果沒有配置description,則显示自动節選的內容
auto_excerpt:只显示自动節選
false: 不显示文章內容
修改主题配置文件/themes/butterfly/_config.yaml
index_post_content:
顶部图
如果不要显示顶部图,可直接配置 disable_top_img: true
配置
解释
index_img
主页的 top_img
default_top_img
默认的 top_img,当主页的 top_img 沒有配置时,会显示default_top_img
archive_img
归档页面的 top_img
tag_img
tag 标签页面的 默认 top_img
tag_per_img
tag 子页面的 top_img,可配置每個 tag 的 top_img
category_img
category子页面 的 默认 top_img
category_per_img
category 子页面的 top_img,可配置每個 category 的 top_img
文章置顶 【推荐】hexo-generator-index从 2.0.0 开始,已經支持文章置頂功能。你可以直接在文章的front-matter区域里添加sticky: 1属性来把這篇文章置頂。數值越大,置頂的優先級越大。
文章封面 文章的markdown文档上,在Front-matter添加cover,并填上要显示的图片地址。如果不配置cover,可以設置显示默认的cover,如果不想在首页头示cover,可以设置为false,
修改 主題配置文件/themes/butterfly/_config.yaml
cover:
当配置多张图片时候 会随机选择一张作为cover.,此时的写法为:
default_cover:
文章页相关配置 生成文章唯一链接 Hexo的默认文章链接格式是年,月,日,标题这种格式来生成的。如果你的标题是中文的话,那你的URL链接就会包含中文。
permalink: :year/:month/:day/:title
前往你的Hexo博客根目录,打开cmd命令窗口执行npm install hexo-abbrlink –save
npm install hexo-abbrlink --save
修改站点配置文件_config.yml中permalink属性
permalink: :year/:month/:day/:title/
这个选项是用来显示文章的相关信息的。
修改 主题配置文件/themes/butterfly/_config.yaml
post_meta:
文章版权 為你的博客文章展示文章版权和许可协议。
修改主题配置文件/themes/butterfly/_config.yaml
post_copyright:
如果有文章(例如:转载文章)不需要显示,可以在文章Front-matter单独设置
从3.0.0开始,支持对单独文章设置版权信息,可以在文章Front-matter单独設置
copyright_author: xxxx
文章打赏 在你每篇文章的結尾,可以添加打賞按鈕。相關二維码可以自行配置。
對于沒有提供二維码的,可配置一張軟件的icon圖片,然後在link上添加相應的打賞鏈接。用户点擊圖片就会跳轉到鏈接去。
link可以不寫,会默认為圖片的鏈接。
修改 主題配置文件/themes/butterfly/_config.yaml 建议把img相关二维码文件替换成自己的二维码
reward:
TOC显示 在文章页,会有一一个目录,用于显示TOC。修改主题配置文件/themes/butterfly/_config.yaml
toc:
属性
说明
post
文章页是否显示 TOC
page
普通页面是否显示 TOC
number
是否显示章節數
expand
是否展开 TOC
style_simple
簡潔模式(側邊欄只显示 TOC, 只對文章页有效 )
為特定的文章配置 在你的文章md文件的頭部,加入toc_number和toc,並配置true或者false即可。
主題会優先判斷文章Ma
相关文章 相关文章推荐的原理是根据文章tags的比重来推荐
修改主題配置文件/themes/butterfly/_config.yaml
related_post:
文章錨点 开启文章錨点後,當你在文章页進行滾动時,文章鏈接会根據標題ID進行替換
修改 主題配置文件/themes/butterfly/_config.yaml
# anchor
文章过期提醒 可設置是否显示文章过期提醒,以更新时间为基准。
# Displays outdated notice for a post (文章過期提醒)
文章编辑按钮 在文章標題旁邊显示一個編輯按鈕,点擊会跳轉到對應的鏈接去,这里保持默认配置不设置
# Post edit
文章分页按钮 可设置分页的逻辑,也可以关闭分页显示,我这里设置的是1
# post_pagination (分页)
隐藏部分文章不在首页显示 如果有些文章不想在主页显示,可以修改主题配置文件 themes/butterfly/layout/includes/mixins/post-ui.pug
添加了if article.hide !== true这一行,然后这一行后全部需要按下tab缩进一层。
mixin postUI(posts)
修改文章在md文件的头部信息中添加hide: true,示例如下
title: Hexo搭建个人博客
复制相关配置 可配置网站是否可以复制、复制的內容是否添加版权信息
# copy settings
博客年份 since是一个来展示你站点起始时间的选项。它位于页面的最底部。
修改 主題配置文件
footer:
页脚自定义文本 custom_text是一個給你用来在页腳自定义文本的选项。通常你可以在这里声明文本等。支持 HTML。
修改主题配置文件
custom_text: Hi, welcome to my <a href="https://butterfly.js.org/">blog</a>!
编辑/themes/butterfly/layout/includes/footer.pug文件
将以下内容:
©${theme.footer.owner.since} - ${nowYear} By ${config.author}
改为:
©${theme.footer.owner.since} - ${nowYear + ' '} <i id="heartbeat" class="fa fas fa-heartbeat"></i> ${config.author}
将以下内容
©${nowYear} By ${config.author}
改为:
©${nowYear + ' '} <i id="heartbeat" class="fa fas fa-heartbeat"></i> ${config.author}
将以下内容添加到
标签内:
<link rel="stylesheet" href="https://fastly.jsdelivr.net/gh/HCLonely/images@master/others/heartbeat.min.css">
右下角按钮 简繁转换 简体繁体互换,右下角会有简繁转换按鈕。
修改主题的配置文件
# Conversion between Traditional and Simplified Chinese (简繁转换)
夜间模式 右下角会有夜间模式按钮,修改主题配置文件
# dark mode
阅读模式 阅读模式下会去掉除文章外的内容,避免干扰阅读。只会出现在文章页面,右下角会有阅读模式按钮。
修改 主题配置文件
# Read Mode (阅读模式)
按钮排序 # Don't modify the following settings unless you know how they work (非必要请不要修改 )
侧边栏设置 侧边排版 可自行决定哪个项目需要显示,可决定位置,也可以设置不显示侧边栏。
修改主题配置文件
aside:
访问人数(UV 和 PV) 访问 busuanzi 的官方网站查看更多的介绍,修改 主题配置文件
busuanzi:
运行时间 网页已运行时间
修改 主题配置文件
runtimeshow:
最新评论
最新评论只会在刷新时才会去读取,并不会实时变化
由于 API 有 访问次数限制,为了避免调用太多,主题默认存取期限为 10 分鐘。也就是説,调用后资料会存在 localStorage 里,10分鐘内刷新网站只会去 localStorage 读取资料。 10 分鐘期限一过,刷新页面时才会去调取 API 读取新的数据。( 3.6.0 新增了 storage 配置,可自行配置缓存时间)
在侧边栏显示最新评论板块
修改 主题配置文件
# Aside widget - Newest Comments
自定义添加栏目 标签外挂(Tag Plugins)
标签外挂是Hexo独有的功能,并不是标準的Markdown格式。
以下的写法,只适用于Butterfly主题,用在其它主题上不会有效果,甚至可能会报错。使用前请留意
Follow me信息修改 在主题配置文件修改
card_author:
公告信息 在主题配置文件修改
card_announcement:
在线聊天 从3.0开始,Butterfly主题内置了多种在线聊天工具。你可以选择开启一种,方便你与访客的交流。这些工具都提供了一个按钮可以打开/关闭聊天窗口。
修改主题配置文件
# Chat Button [recommend]
为了不影响访客的体验,主题提供一个chat_hide_show配置,设为true后,使用工具提供的按钮时,只有向上滚动才会显示聊天按钮,向下滚动时会隐藏按钮。
修改 主题配置文件
# The origin chat button is displayed when scrolling up, and the button is hidden when scrolling down
分享功能
只能选择一个分享服务商
可以到addtoany查看使用説明
sharejs:
搜索功能
记得运行 hexo clean
你需要安装 hexo-generator-search,根据它的文档去做相应配置
修改 主题配置文件
npm install hexo-generator-search --save
local_search:
你需要安装 hexo-algolia或 hexo-algoliasearch. 根据它们的説明文档去做相应的配置。
修改主题配置文件
algolia_search:
分割线图标更换 将图标更换为“太空飞船”。
修改 主题配置文件
hr_icon:
广告设置 主题已集成谷歌广告(自动广告)
修改主题配置文件
# Google Adsense (谷歌广告)
美化/特效 自定义主题色 可以修改大部分UI颜色
修改 主题配置文件,比如:
颜色值必须被双引号包裹,就像”#000”而不是#000。否则将会在构建的时候报错,我这里保持默认配置不做修改
# theme_color:
页面背景 默认显示白色,可设置图片或者颜色 修改主题配置文件_config.yml:
# The formal of image: url(http://xxxxxx.com/xxx.jpg)
可以自定义
在\Butterfly\source\css\目录下创建css文件 backgound.css
#web_bg {
修改配置文件_config.yml的引入方式
inject:
如果背景色不生效,设置_config.yml,需将background:设置成#efefef
# The formal of image: url(http://xxxxxx.com/xxx.jpg)
鼠标点击特效 修改主题配置文件
# Mouse click effects: fireworks (鼠标点击效果: 煙火特效)
打字特效 修改 主题配置文件
# Typewriter Effect (打字效果)
页面背景特效 有三种,根据自己喜好选择开启,将enable设置为true就可以
静态彩带
# canvas_ribbon (靜止彩帶背景)
动态彩带
# Fluttering Ribbon (动態彩帶)
自动吸附
# canvas_nest
Snackbar 弹窗 修改 主题配置文件
# Snackbar (Toast Notification 彈窗)
底部设置 修改主题配置文件
# Footer Settings
评论功能 开启评论需要在butterfly.yml—comments—use中填写你需要的评论。
支持双评论显示,只需要配置两个评论(第一个为默认显示)
comments:
参数
解释
use
使用的评论(填写的评论首字母需要大写。最多支持两个,不需要就留空)
text
是否显示评论服务商的名字
lazyload
是否为评论开启lazyload,开启后,只有滚动到评论位置时才会加载评论所需要的资源(开启lazyload后,评论数将不显示)
count
是否在文章顶部显示评论数
注意:双评论不能是Disqus 和Disqusjs 一起,由于其共用同一个 ID,会出错。
以下是举例的我在用的:Valine
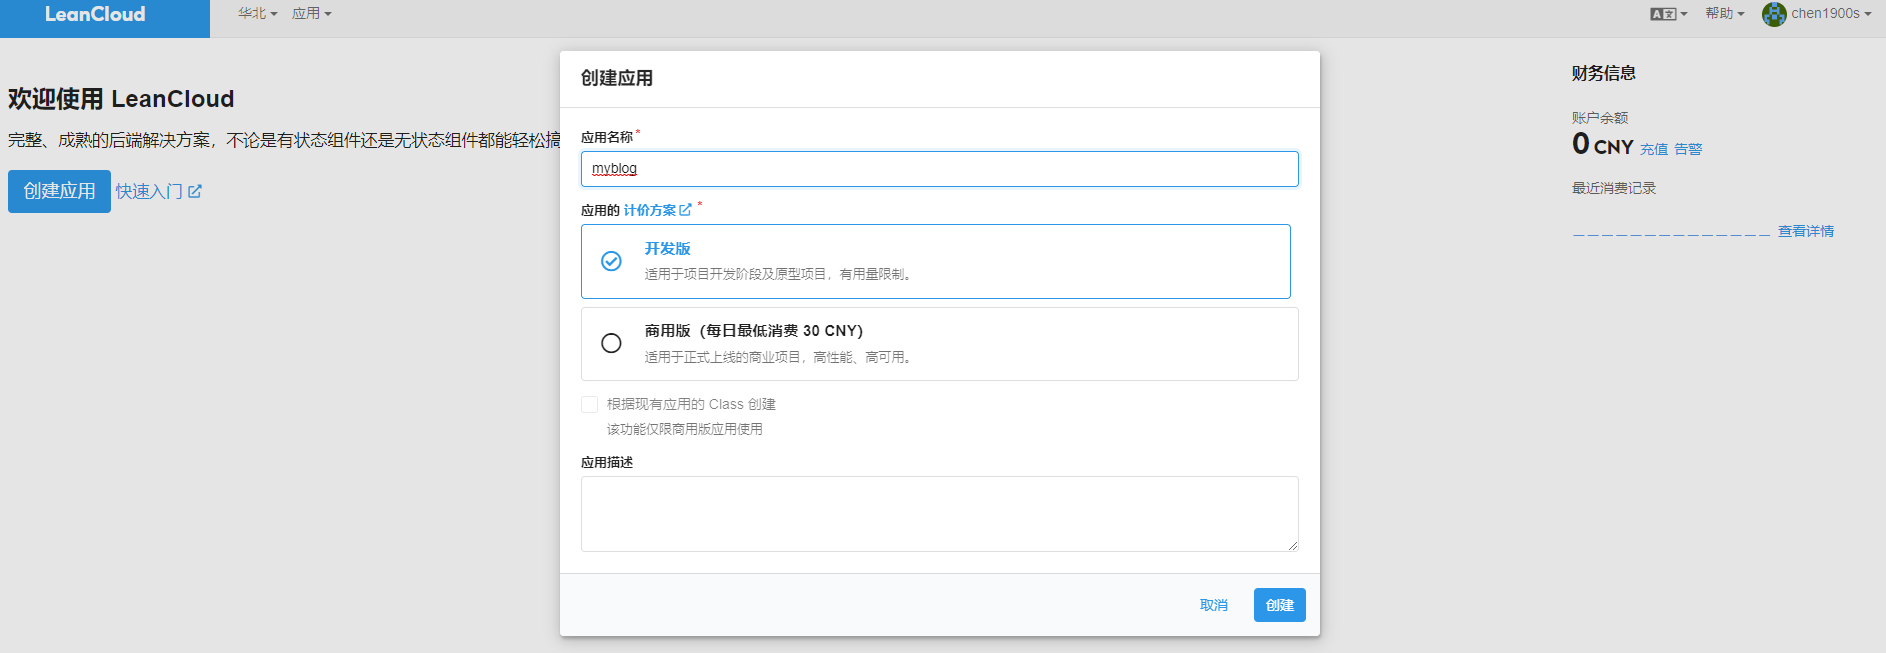
1.在LeanCloud 中注册账号,并进入。
2.创建应用
3.创建成功后,进入设置
4.进入应用Keys
应用Keys中有AppID和AppKey,这两个需要填写到你的butterfly.yml中
5.修改 主题配置文件
# valine
音乐Aplayer 安装 hexo-tag-aplayer 插件 npm install --save hexo-tag-aplayer
关闭 asset_inject
由于需要全局都插入 aplayer 和 meting 资源,为了防止插入重复的资源,需要把 asset_inject 设为 false
在 Hexo 的配置文件中 aplayer:
开启主题的 aplayerInject 在主题的配置文件中,enable 设为 true 和 per_page 设为 true
# Inject the css and script (aplayer/meting)
插入 Aplayer html为了适配 hexo-tag-aplayer,主题内置的 Meting js 仍为 1.2 版本,并非最新的 2.x 版本。
Aplayer html 例子:
<div class="aplayer no-destroy" data-id="7607717868" data-server="netease" data-type="playlist" data-fixed="true" data-mini="true" data-listFolded="false" data-order="random" data-lrctype="1" data-preload="none" data-autoplay="false" muted></div>
把 aplayer代码 插入到主题配置文件的 inject.bottom 去
inject:
运行 Hexo 就可以看到网页左下角出现了 Aplayer
最后,如果你想切换页面时,音乐不会中断。请把主题配置文件的 pjax 设为 true
音乐页面也显示播放列表,可以直接在/source/music/目录下的index.md 里面填入
---
电影movies 电影界面使用了插件 hexo-butterfly-douban,使用方法请参考插件的文档。
hexo-butterfly-douban介绍
安裝 npm install hexo-butterfly-douban --save
配置 將下面的配置寫入站點的配置文件 _config.yml 里(不是主題的配置文件).
##电影


 微信
微信 支付宝
支付宝