


背景
NFS subdir external provisioner组件是使用现有的和已配置的NFS服务器来支持通过持久卷声明动态分发Kubernetes持久卷。持久化卷按以下方式命名${namespace}-${pvcName}-${pvName},在Kubernetes 环境中我们经常遇到是一个PV对应一个NFS实例场景,针对这种场景如果需要多个PVC&PV使用一个NFS实例,就需要提前根据NFS不同子目录创建大量的PV等待PVC去绑定,不太好维护,可以使用nfs-subdir-external-provisioner插件来实现动态创建子目录的需求,下面主要来介绍下
部署安装
环境准备:
- kubernetes集群一个,我这里是使用的是腾讯云TKE集群
- NFS服务器实例,或者使用云厂商提供的NFS产品
- helm客户端,并且能够正常链接到集群
Helm方式安装
可以根据需求修改指定参数后部署
确保您的NFS服务器可以从您的Kubernetes集群访问,并获取连接到它所需的信息。至少需要它的主机名和共享路径。
$ helm repo add nfs-subdir-external-provisioner https://kubernetes-sigs.github.io/nfs-subdir-external-provisioner/

# helm repo list  #查看添加helm repo仓库情况
NAME                            URL
tcr-chen-helm                   https://tcr-chen.tencentcloudcr.com/chartrepo/helm
nfs-subdir-external-provisioner https://kubernetes-sigs.github.io/nfs-subdir-external-provisioner/

# 【可选步骤,可以将helm chart 包下载下来 上传到自己的镜像仓库,方便后续其他集群安装】
# 下载 helm chart 文件至本地目录,查看可以指定的 values 选项(可选)
$ helm pull nfs-subdir-external-provisioner/nfs-subdir-external-provisioner --untar
$ tar  zcvf nfs-subdir-external-provisioner-1.0.0.tgz nfs-subdir-external-provisioner/
$ helm cm-push nfs-subdir-external-provisioner-1.0.0.tgz  tcr-chen-helm
# 默认镜像是国外镜像,可以下载下来上传到自己的镜像仓库里面
$ docker pull k8s.gcr.io/sig-storage/nfs-subdir-external-provisioner:v4.0.2
$ docker tag 932b0bface75 ccr.ccs.tencentyun.com/chenjingwei/nfs-subdir-external-provisioner:v4.0.2
$ docker push ccr.ccs.tencentyun.com/chenjingwei/nfs-subdir-external-provisioner:v4.0.2


# 使用类似下面命令安装 nfs-subdir-external-provisioner 资源
#  helm install nfs-subdir-external-provisioner nfs-subdir-external-provisioner/nfs-subdir-external-provisioner  \
--set nfs.server=172.16.0.33  \
--set nfs.path=/nfs  \
--set image.repository=ccr.ccs.tencentyun.com/chenjingwei/nfs-subdir-external-provisioner \
--set image.tag=v4.0.2

#出现如下提示 表示安装成功
NAME: nfs-subdir-external-provisioner
LAST DEPLOYED: Tue Feb 15 13:22:03 2022
NAMESPACE: default
STATUS: deployed
REVISION: 1
TEST SUITE: Non
手动YAML安装
1,创建账号ServiceAccount
apiVersion: v1
kind: ServiceAccount
metadata:
  name: nfs-client-provisioner
  # replace with namespace where provisioner is deployed
  namespace: default
---
kind: ClusterRole
apiVersion: rbac.authorization.k8s.io/v1
metadata:
  name: nfs-client-provisioner-runner
rules:
  - apiGroups: [""]
    resources: ["nodes"]
    verbs: ["get", "list", "watch"]
  - apiGroups: [""]
    resources: ["persistentvolumes"]
    verbs: ["get", "list", "watch", "create", "delete"]
  - apiGroups: [""]
    resources: ["persistentvolumeclaims"]
    verbs: ["get", "list", "watch", "update"]
  - apiGroups: ["storage.k8s.io"]
    resources: ["storageclasses"]
    verbs: ["get", "list", "watch"]
  - apiGroups: [""]
    resources: ["events"]
    verbs: ["create", "update", "patch"]
---
kind: ClusterRoleBinding
apiVersion: rbac.authorization.k8s.io/v1
metadata:
  name: run-nfs-client-provisioner
subjects:
  - kind: ServiceAccount
    name: nfs-client-provisioner
    # replace with namespace where provisioner is deployed
    namespace: default
roleRef:
  kind: ClusterRole
  name: nfs-client-provisioner-runner
  apiGroup: rbac.authorization.k8s.io
---
kind: Role
apiVersion: rbac.authorization.k8s.io/v1
metadata:
  name: leader-locking-nfs-client-provisioner
  # replace with namespace where provisioner is deployed
  namespace: default
rules:
  - apiGroups: [""]
    resources: ["endpoints"]
    verbs: ["get", "list", "watch", "create", "update", "patch"]
---
kind: RoleBinding
apiVersion: rbac.authorization.k8s.io/v1
metadata:
  name: leader-locking-nfs-client-provisioner
  # replace with namespace where provisioner is deployed
  namespace: default
subjects:
  - kind: ServiceAccount
    name: nfs-client-provisioner
    # replace with namespace where provisioner is deployed
    namespace: default
roleRef:
  kind: Role
  name: leader-locking-nfs-client-provisioner
  apiGroup: rbac.authorization.k8s.io
2,部署应用
apiVersion: apps/v1
kind: Deployment
metadata:
  name: nfs-client-provisioner
  labels:
    app: nfs-client-provisioner
  # replace with namespace where provisioner is deployed
  namespace: default
spec:
  replicas: 1
  strategy:
    type: Recreate
  selector:
    matchLabels:
      app: nfs-client-provisioner
  template:
    metadata:
      labels:
        app: nfs-client-provisioner
    spec:
      serviceAccountName: nfs-client-provisioner
      containers:
        - name: nfs-client-provisioner
          image: ccr.ccs.tencentyun.com/chenjingwei/nfs-subdir-external-provisioner:v4.0.2
          volumeMounts:
            - name: nfs-client-root
              mountPath: /persistentvolumes
          env:
            - name: PROVISIONER_NAME
              value: cluster.local/nfs-subdir-external-provisioner
            - name: NFS_SERVER
              value: 172.16.0.33              #替换成自己的NFS服务器地址
            - name: NFS_PATH
              value: /nfs                     #NFS上面的目录
      volumes:
        - name: nfs-client-root
          nfs:
            server: 172.16.0.33
            path: /nfs
3,创建storageClass
apiVersion: storage.k8s.io/v1
kind: StorageClass
metadata:
  name: nfs-client
provisioner: cluster.local/nfs-subdir-external-provisioner # or choose another name, must match deployment's env PROVISIONER_NAME'
parameters:
  archiveOnDelete: "false"
基本使用
前提是nfs-subdir-external-provisioner组件已经正常运行
1,配置使用 CFS 文件系统子目录的 PVC
使用上一步部署的nfs-subdir-external-provisioner动态创建存储卷。
部署后会默认生成一个StorageClass,默认存储类名是"nfs-client"(也可以在部署时自定义指定),如下:
# kubectl  get StorageClass | grep nfs-client
nfs-client          cluster.local/nfs-subdir-external-provisioner   4m8s
2,使用上面的StorageClass创建PVC
kind: PersistentVolumeClaim
apiVersion: v1
metadata:
  name: nfs-subdir-pvc
  namespace: cjweichen
spec:
  storageClassName: nfs-client
  accessModes:
    - ReadWriteMany
  resources:
    requests:
      storage: 10Gi
# kubectl  get pvc
NAME              STATUS   VOLUME                                   CAPACITY   ACCESS MODES   STORAGECLASS    AGE
nfs-subdir-pvc    Bound    pvc-5fdb9f45-6e98-4a9b-b6e0-920a6c7a6edc   10Gi       RWX           nfs-client    76s
会自动创建命令,命令命名方式是${namespace}-${pvcName}-${pvName}
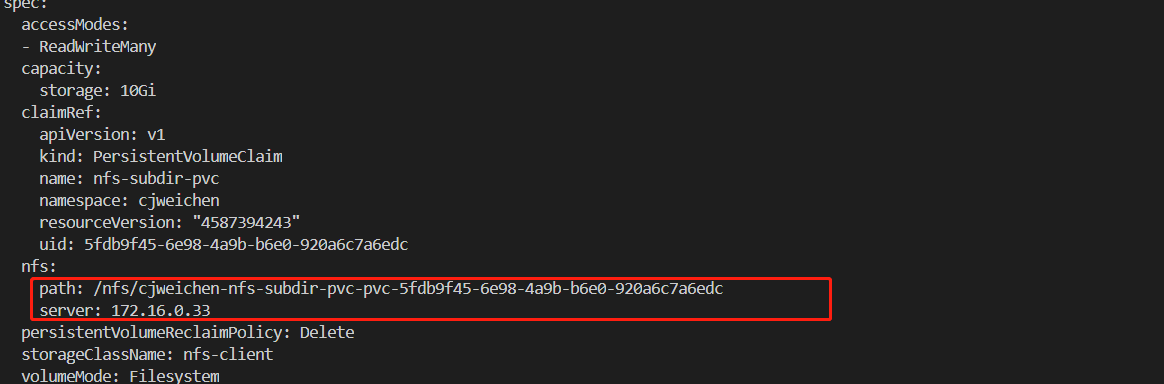
3,查看自动创建的PV配置
4,创建workload 挂载对应PVC
apiVersion: apps/v1
kind: Deployment
metadata:
  labels:
    k8s-app: centos
  name: centos
  namespace: cjweichen
spec:
  replicas: 1
  selector:
    matchLabels:
      k8s-app: centos
  template:
    metadata:
      labels:
        k8s-app: centos
    spec:
      containers:
      - args:
        - -c
        - sleep 360000
        command:
        - /bin/sh
        image: centos:latest
        imagePullPolicy: IfNotPresent
        name: centos
        volumeMounts:
        - mountPath: /mnt
          name: nfs
      volumes:
      - name: nfs
        persistentVolumeClaim:
          claimName: nfs-subdir-pvc
# pwd
/nfs/cjweichen-nfs-subdir-pvc-pvc-5fdb9f45-6e98-4a9b-b6e0-920a6c7a6edc
