


NFS是Network File System的缩写,即网络文件系统,是一种使用于分散式文件系统的协定。主要是通过网络让不同的机器、不同的操作系统能够彼此分享个别的数据,让应用程序在客户端通过网络访问位于服务器磁盘中的数据,是在类Unix系统间实现磁盘文件共享的一种方法。这个NFS服务器可以让你的PC来将网络远程的NFS服务器分享的目录,挂载到本地端的机器当中, 在本地端的机器看起来,那个远程主机的目录就好像是自己的一个磁盘分区槽一样。
更多NFS相关原理网上有很多,这里就不做多介绍,这里我们主要说下NFS安装和腾讯云TKE里面如何使用自建NFS进行POD的持久化存储
NFS 服务搭建
环境准备
CentOS7以NFSv4作为默认版本,NFSv4使用TCP协议(端口号是2049)和NFS服务器建立连接。
# 系统环境
系统平台:CentOS Linux release 7.9 (Final)
NFS Server IP:192.168.0.17

防火墙已关闭/iptables: Firewall is not running.
SELINUX=disabled
安装 NFS 服务
NFS服务端
服务端,程序包名
nfs-utils、rpcbind,默认都已经安装了可以通过
rpm -ql nfs-utils查看帮助文档等信息NFS客户端
客户端,需要安装程序包名
nfs-utils,提供基本的客户端命令工具
[root@VM-0-17-tlinux ~/nfs]# yum install nfs-utils -y
查看
NFS服务端口NFS启动时会随机启动多个端口并向RPC注册,为了方便配置防火墙,需要固定NFS服务端口。这样如果使用
iptables对NFS端口进行限制就会有点麻烦,可以更改配置文件固定NFS服务相关端口分配端口,编辑配置文件
/etc/sysconfig/nfs
# 使用rpcinfo -P会发现rpc启动了很多监听端口

[root@VM-0-17-tlinux ~/nfs]#  vim /etc/sysconfig/nfs
RQUOTAD_PORT=30001
LOCKD_TCPPORT=30002
LOCKD_UDPPORT=30002
MOUNTD_PORT=30003
STATD_PORT=30004
启动NFS服务:
[root@VM-0-17-tlinux ~/nfs]# systemctl start nfs.service
NFS配置
相关文件和命令
| 文件名 | 说明 |
|---|---|
/etc/exports |
NFS 服务器端需要设定的内容,其作用是设定谁拥有什么样的权限去访问此机器的哪个目录 |
/var/lib/nfs/etab |
无需设定,用于纪录 NFS 服务器完整的权限设定,exports 中没有设定的缺省值也会被列出 |
/var/lib/nfs/xtab |
纪录 NFS 连接的相关信息 |
/usr/sbin/exportfs |
NFS 设定管理命令,用于 Server 侧设定,通过此条命令使得 exports 的设定变得有效或者无效 |
/usr/sbin/showmount |
用于显示 NFS 设定的相关信息,Server 端和 Client 端均可 |
配置文件/etc/exports
我们可以按照“共享目录的路径 允许访问的 NFS 客户端(共享权限参数)”的格式,定义要共享的目录与相应的权限
| 常用参数 | 作用 |
|---|---|
ro |
只读 |
rw |
读写 |
sync |
同时将数据写入到内存与硬盘中,保证不丢失数据 |
async |
优先将数据保存到内存,然后再写入硬盘;这样效率更高,但可能会丢失数据 |
root_squash |
当 NFS 客户端以 root 管理员访问时,映射为 NFS 服务器的匿名用户 |
all_squash |
无论 NFS 客户端使用什么账户访问,均映射为 NFS 服务器的匿名用户 |
no_root_squash |
当 NFS 客户端以 root 管理员访问时,映射为 NFS 服务器的 root 管理员 |
secure |
这个选项是缺省选项,它使用了 1024 以下的 TCP/IP 端口实现 NFS 的连接 |
insecure |
禁止使用了 1024 以下的 TCP/IP 端口实现 NFS 的连接 |
no_wdelay |
这个选项关闭写延时,如果设置了 async,那么 NFS 就会忽略这个选项 |
nohide |
如果将一个目录挂载到另外一个目录之上,那么原来的目录通常就被隐藏起来或看起来像空的一样。要禁用这种行为,需启用 hide 选项 |
no_subtree_check |
这个选项关闭子树检查,子树检查会执行一些不想忽略的安全性检查,缺省选项是启用子树检查 |
no_auth_nlm |
这个选项也可以作为insecure_locks指定,它告诉 NFS 守护进程不要对加锁请求进行认证。如果关心安全性问题,就要避免使用这个选项。缺省选项是auth_nlm或secure_locks。 |
mp(mountpoint=path) |
通过显式地声明这个选项,NFS 要求挂载所导出的目录 |
fsid=num |
这个选项通常都在 NFS 故障恢复的情况中使用,如果希望实现 NFS 的故障恢复,请参考 NFS 文 |
[root@VM-0-17-tlinux ~/nfs]# cat /etc/exports
/nfs 192.168.*.*(rw,sync,root_squash)

#修改完配置后 重新启动nfs服务
[root@VM-0-17-tlinux ~/nfs]# systemctl   restart nfs
[root@VM-0-17-tlinux ~/nfs]# systemctl   status  nfs
TKE使用NFS持久化挂载
将NFS挂在到K8S容器服务的POD里面
示例一 inline方式挂载
完整yaml:
apiVersion: apps/v1
kind: Deployment
metadata:
  labels:
    k8s-app: centos
  name: centos
  namespace: default
spec:
  replicas: 1
  selector:
    matchLabels:
      k8s-app: centos
  template:
    metadata:
      labels:
        k8s-app: centos
    spec:
      containers:
      - args:
        - -c
        - sleep 360000
        command:
        - /bin/sh
        image: centos:latest
        imagePullPolicy: IfNotPresent
        name: centos
        resources: {}
        volumeMounts:
        - mountPath: /mnt           #POD里面的挂载路径
          name: nfs
      volumes:
      - name: nfs
        nfs:
          path: /nfs                       #nfs文件里面目录
          server: 192.168.0.17             #NFS服务器IP
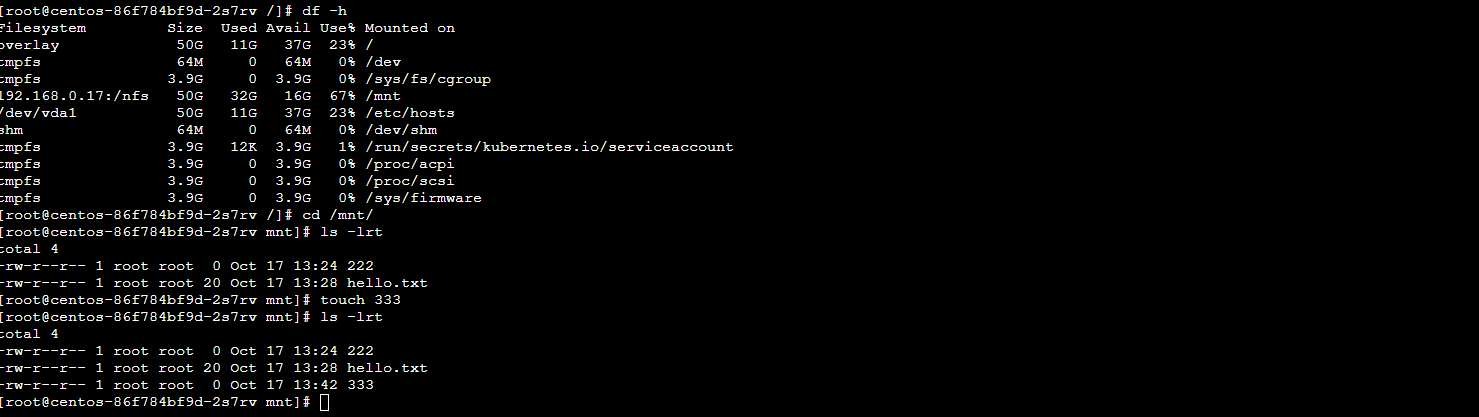
登陆NFS服务 创建个临时文件,然后登陆POD里查看
[root@VM-0-17-tlinux ~/nfs]# cd /nfs/
[root@VM-0-17-tlinux /nfs]# echo  hello worload > hello.txt
[root@VM-0-17-tlinux /nfs]# cat hello.txt
hello worload

#登录容器查看挂着情况
[root@VM-0-17-tlinux /nfs]# kubectl  exec -it centos-54db87ccc9-nkx86 -- /bin/bash
[root@centos-54db87ccc9-nkx86 /]#
[root@centos-54db87ccc9-nkx86 /]# df -h
Filesystem         Size  Used Avail Use% Mounted on
overlay             50G   11G   37G  23% /
tmpfs               64M     0   64M   0% /dev
tmpfs              3.9G     0  3.9G   0% /sys/fs/cgroup
192.168.0.17:/nfs   50G   32G   16G  67% /mnt                        #挂载点,可以看到已经挂载成功的
/dev/vda1           50G   11G   37G  23% /etc/hosts
shm                 64M     0   64M   0% /dev/shm
tmpfs              3.9G   12K  3.9G   1% /run/secrets/kubernetes.io/serviceaccount
tmpfs              3.9G     0  3.9G   0% /proc/acpi
tmpfs              3.9G     0  3.9G   0% /proc/scsi
tmpfs              3.9G     0  3.9G   0% /sys/firmware
[root@centos-54db87ccc9-nkx86 /]# cd /mnt/
[root@centos-54db87ccc9-nkx86 mnt]# cat hello.txt
hello worload
[root@centos-54db87ccc9-nkx86 mnt]# echo 1111>> hello.txt         #在POD往文件系统里面写文件
bash: hello.txt: Permission denied                                #没有权限
[root@centos-54db87ccc9-nkx86 mnt]ls -lrt
total 4
-rw-r--r-- 1 root root 14 Oct 17 13:14 hello.txt
可以看到 上面我们的 NFS配置的是root_squash
/etc/exports
/nfs 192.168.*.*(rw,sync,root_squash)
#是没有权限修改文件
下面我们将配置文件修改成如下配置进行测试
[root@VM-0-17-tlinux /nfs]# cat /etc/exports
/nfs 192.168.*.*(rw,sync,no_root_squash)

#重启NFS 服务
[root@VM-0-17-tlinux /nfs]# systemctl  restart nfs
[root@VM-0-17-tlinux /nfs]# systemctl status nfs
将POD销毁重建后登录POD里测试。可以修改文件 并且可以创建文件
[root@centos-54db87ccc9-rgnk8 mnt]# touch 222
[root@centos-54db87ccc9-rgnk8 mnt]# ls
222  hello.txt
[root@centos-54db87ccc9-rgnk8 mnt]# echo "1111">> hello.txt
[root@centos-54db87ccc9-rgnk8 mnt]# cat hello.txt
hello worloada
1111
[root@centos-54db87ccc9-rgnk8 mnt]# ls -lrt
total 4
-rw-r--r-- 1 root root  0 Oct 17 13:24 222
-rw-r--r-- 1 root root 20 Oct 17 13:28 hello.txt
示例二 PVC&PV方式挂载
使用PVC和PV方式创建并挂载,示例如下:
---
apiVersion: v1
kind: PersistentVolume
metadata:
  name: pv-operationdata
spec:
  accessModes:
     - ReadWriteMany
  capacity:
     storage: 10Gi                    #针对NFS类文件存储,storage大小没有实际意义
  csi:
    driver: com.tencent.cloud.csi.cfs
    volumeAttributes:
       host: 192.168.0.17                #替换成自己的NFS
       path: /nfs                         #替换成自己的目录
    volumeHandle: pv-operationdata
  persistentVolumeReclaimPolicy: Retain
  volumeMode: Filesystem
---
apiVersion: v1
kind: PersistentVolumeClaim
metadata:
  name: pvc-operationdata
  namespace: default
spec:
  accessModes:
  - ReadWriteMany
  resources:
    requests:
      storage: 10Gi
  storageClassName: ""
  volumeMode: Filesystem
  volumeName: pv-operationdata
---
apiVersion: apps/v1
kind: Deployment
metadata:
  labels:
    k8s-app: centos
  name: centos
  namespace: default
spec:
  replicas: 1
  selector:
    matchLabels:
      k8s-app: centos
  template:
    metadata:
      labels:
        k8s-app: centos
    spec:
      containers:
      - args:
        - -c
        - sleep 360000
        command:
        - /bin/sh
        image: centos:latest
        imagePullPolicy: IfNotPresent
        name: centos
        resources: {}
        volumeMounts:
        - mountPath: /mnt
          name: nfs
      volumes:
      - name: nfs
        persistentVolumeClaim:
          claimName: pvc-operationdata
示例三 CVM服务器端挂载
- 使用
showmount命令查询NFS服务器的远程共享信息 showmount命令输出格式为“共享的目录名称 允许使用客户端地址”
showmount`命令**
| 参数 | 作用 |
|---|---|
-e |
显示 NFS 服务器的共享列表 |
-a |
显示本机挂载的文件资源的情况 NFS 资源的情况 |
-v |
显示版本号 |
exportfs命令
- 维护
exports文件导出的文件系统表的专用工具,可以修改配置之后不重启NFS服务 export -ar:重新导出所有的文件系统export -au:关闭导出的所有文件系统export -u FS::关闭指定的导出的文件系统
# 查看NFS服务器端共享的文件系统
# showmount -e NFSSERVER_IP
[root@VM-0-17-tlinux ~/nfs]#  showmount -e 192.168.0.17
Export list for 192.168.0.17:
/nfs 192.168.*.*

# NFS客户端创建一个挂载目录,挂载服务端NFS文件系统到本地
# mount -t nfs SERVER:/path/to/sharedfs  /path/to/mount_point
[root@VM-0-11-tlinux ~]# mkdir /nfsfile
[root@VM-0-11-tlinux ~]# mount -t nfs 192.168.0.17:/nfs /nfsfile
[root@VM-0-11-tlinux ~]# df -h | grep nfsfile
192.168.0.17:/nfs    50G   32G   16G  67% /nfsfile
# 挂载成功后就应该能够顺利地看到在执行前面的操作时写入的文件内容了
[root@VM-0-11-tlinux ~]# cat /nfsfile/hello.txt
hello worloada
1111

# 如果希望NFS文件共享服务能一直有效,则需要将其写入到fstab文件中
# SERVER:/PATH/TO/EXPORTED_FS  /mount_point  nfs  defaults,_netdev  0  0
[root@VM-0-11-tlinux ~]#  vim /etc/fstab
192.168.0.17:/nfs  /nfsfile nfs defaults 0 0
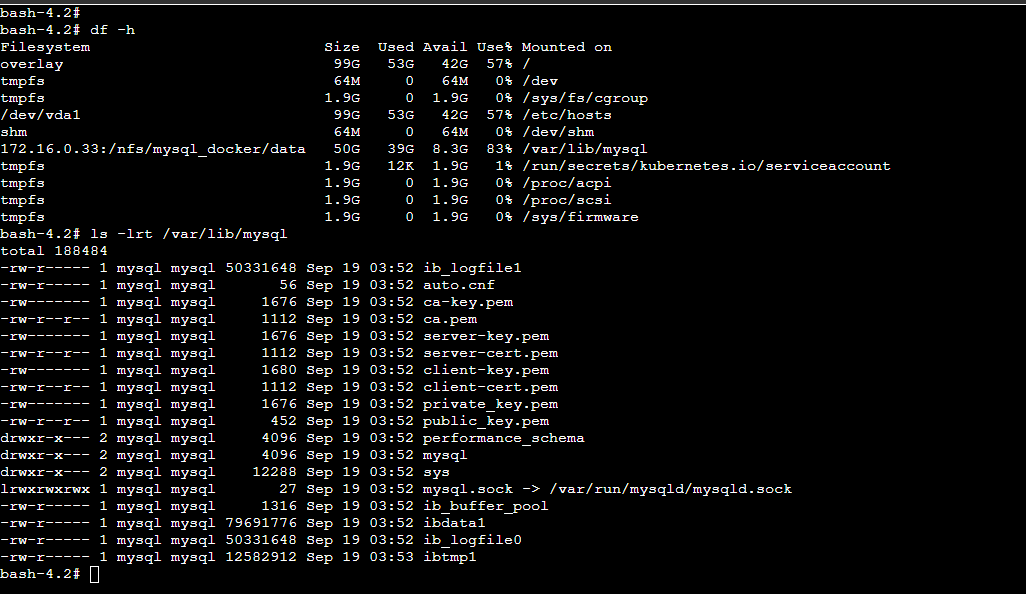
示例四 TKE部署mysql挂载
以下示例使用的是另外搭建的NFS实例
部署mysql服务挂载自建NFS,这里是在NFS里面创建了子目录,通过子目录挂载到mysql的数据目录里面
apiVersion: apps/v1
kind: StatefulSet
metadata:
  name: mysql
  namespace: default
spec:
  replicas: 1
  selector:
    matchLabels:
      k8s-app: mysql
      qcloud-app: mysql
  serviceName: ""
  template:
    metadata:
      labels:
        k8s-app: mysql
        qcloud-app: mysql
    spec:
      containers:
      - env:
        - name: MYSQL_ROOT_PASSWORD
          value: "123456"
        image: mysql:5.7
        imagePullPolicy: IfNotPresent
        name: mysql
        resources: {}
        volumeMounts:
        - mountPath: /var/lib/mysql
          name: nfs
          subPath: mysql_docker/data   #挂载的是NFS子目录
      dnsPolicy: ClusterFirst
      volumes:
      - name: nfs
        nfs:
          path: /nfs
          server: 172.16.0.33           #NFS服务器
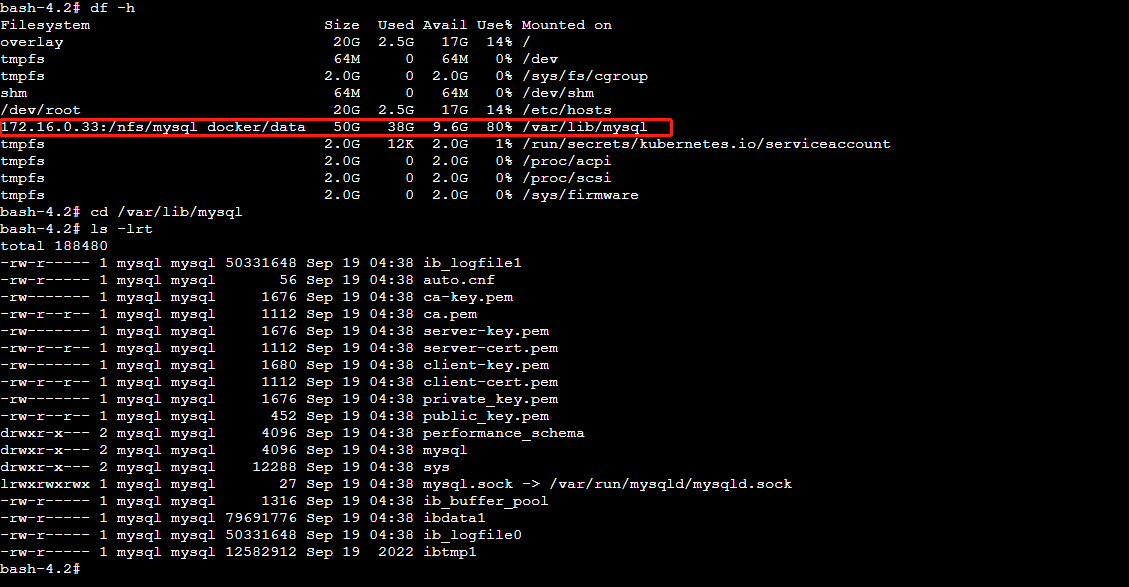
示例五 超级节点POD挂载
挂载自建的 nfs 时,事件可能会报 Operation not permitted
如果使用自建的 nfs 实现持久化存储时,连接时事件报 Operation not permitted。需要修改自建 nfs 的 /etc/exports 文件,添加 /
/nfs 172.16.*.*(rw,insecure)
apiVersion: apps/v1
kind: Deployment
metadata:
  labels:
    k8s-app: centos
  name: centos
  namespace: cjweichen
spec:
  replicas: 1
  selector:
    matchLabels:
      k8s-app: centos
  template:
    metadata:
      labels:
        k8s-app: centos
    spec:
      affinity:
        nodeAffinity:
          requiredDuringSchedulingIgnoredDuringExecution:
            nodeSelectorTerms:
            - matchExpressions:
              - key: kubernetes.io/hostname
                operator: In
                values:
                - eklet-subnet-myqjfu7t
      containers:
      - args:
        - -c
        - sleep 360000
        command:
        - /bin/sh
        image: centos:latest
        imagePullPolicy: IfNotPresent
        name: centos
        resources: {}
        volumeMounts:
        - mountPath: /mnt
          name: nfs
      dnsPolicy: ClusterFirst
      restartPolicy: Always
      volumes:
      - name: nfs
        persistentVolumeClaim:
          claimName: pvc-operationdata
mysql挂载自建NFS 使用inline方式
apiVersion: apps/v1
kind: StatefulSet
metadata:
  labels:
    k8s-app: mysql-nfs-eks
    qcloud-app: mysql-nfs-eks
  name: mysql-nfs-eks
  namespace: default
spec:
  replicas: 1
  selector:
    matchLabels:
      k8s-app: mysql-nfs-eks
      qcloud-app: mysql-nfs-eks
  serviceName: ""
  template:
    metadata:
      labels:
        k8s-app: mysql-nfs-eks
        qcloud-app: mysql-nfs-eks
    spec:
      containers:
      - env:
        - name: MYSQL_ROOT_PASSWORD
          value: "12345"
        image: mysql:5.7
        imagePullPolicy: IfNotPresent
        name: mysql
        resources: {}
        volumeMounts:
        - mountPath: /var/lib/mysql
          name: nfs-vol
          subPath: mysql_docker/data
      dnsPolicy: ClusterFirst
      volumes:
      - name: nfs-vol
        nfs:
          path: /nfs
          server: 172.16.0.33
TKE里面使用NFS介绍就到这里,下一篇介绍下如何为NFS 动态创建不同子目录的 PVC用于POD挂载
感谢!